DIGITAL PHOTOGRAPHY AND IMAGING | TASK 1 - COLLAGE & DIGITAL COLLAGE DESIGN

WEEK 1 | LEARNING & ASSIGNMENT OBJECTIVES - 30.3.2022
.png)
1:1 FOCAL POINT
A key element to any good composition is a strong focal point, as it helps your viewers’ eyes naturally settle on the important pieces of your design first.

Figure 1.1 - Focal point
https://alvalyn.com/5-ways-to-create-a-focal-point/

Figure 1.2 - Scale & Hierarchy
https://digitalsynopsis.com/design/visual-hierarchy-graphic-design-principles/
1:3 WHITE SPACE
White space is mostly known as “empty space” to balance up the main focus of a composition.
White space when used strategically can help boost your design’s clarity and overall look by balancing out the more complicated and busy parts of your composition with space that helps your design to breathe.


1:4 BALANCE THE ELEMENTS
A good technique for mastering asymmetrical balance is to think of each element as having a ‘weight’ to it. Smaller objects might ‘weigh’ less than larger objects, and heavily textured elements might ‘weigh’ more than flatly colored elements.

https://www.webfx.com/blog/web-design/visual-weight-designs/
2. RULE OF THIRDS
1. Use composition techniques that are in line with what’s naturally pleasing to the eye.
2. Creatively use negative space.
3. Create a conversation between the subject and background.
 |
| Figure 2 - Rule of Thirds |
3. GOLDEN RATION
The Golden Ratio is a mathematical ratio. It is commonly found in nature, and when used in a design, it fosters organic and natural-looking compositions that are aesthetically pleasing to the eye.


Photoshop provides several toolsets in the Toolbox, and you can expand the toolsets to reveal additional tools.

- Marquee Selection Tools

- Lasso
- Polygonal Lasso
- Magnetic Lasso

If you like drawing with pencil and paper or cutting and pasting objects from a photo, then you will love the Lasso Tool.

Figure 1.1 -Polygonal Lasso
How to Use the Lasso Tool
The Lasso Tool is great to use with a graphic tablet because it is similar to a pencil.
Unlike a mouse or trackpad, a graphic tablet can give a better flow when drawing and making selections.

Figure 1.2 - Magnetic Lasso
How to Use the Pen Tool
When it comes to actually create a path from scratch, the pen tool is the most common option.
The pen tool is the way that you add these points and the way you drag the tool as you create the points determines how they will look. Remember, the fewer points, the smoother a path will be.

- Straight-line paths
- U shaped curves
- Simple S curves
- Complex S curves
3. Lasso Tool VS Pen Tool


A pen tool is a versatile tool in Photoshop that can be used to create extremely precise shapes and paths, using manually placed anchor points.
Although commonly used to make selections, the pen tool was not natively made as a “selection tool”
1. The advantage of using Layers is that you can save a Photoshop file with all the layers included. This means you can use layers for non-destructive editing.
2. Your adjustments in Photoshop will never destroy the original image.
3. The layers contain all the extra information and/ or images you want to add to the original file.

Mastering selections in Photoshop: The Lasso Tool
https://bit.ly/3uIrIUN
Drawing paths with the Pen Tool
https://bit.ly/3e0uspY
How to start using Photoshop Layer
https://expertphotography.com/photoshop-layers

The Adjustment Layers in Photoshop are a group of super useful, non-destructive image editing tools that add color and tonal adjustments to your image without permanently changing its pixels.
With the adjustment layers, you can edit and discard your adjustments or restore your original image at any time. This will make your workflow in Photoshop more flexible and efficient and is an absolute must-know.

When you add an adjustment layer to your image, a new layer will appear over your image and a Properties panel specific to the type of adjustment you’ve selected will pop up. The Properties panel will allow you to modify your adjustment layer, which in turn will modify your image.

1. BRIGHTNESS / CONTRAST
Brightness / Contrast makes adjustments to the tonal range of your image.
The brightness slider is for adjusting the highlights in your image and the Contrast slider is for adjusting the shadows in your image.

2. LEVEL
Levels modify the tonal values in an image by adjusting the levels of the shadows, mid tones, and highlights.
It’s one of the most used tools in the adjustment layer panel, and using just a touch of levels will go a long way in correcting your images

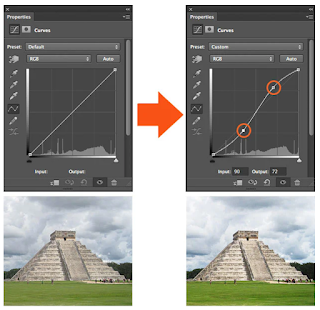
3. CURVES
Curves let you adjust as many points as you want throughout the entire tonal range of your image, and is the most powerful and precise tool for editing the tones in an image.
Exposure lets you adjust exposure levels with three sliders: Exposure, Offset, and Gamma.
Exposure will adjust only the highlights of the image, Offset adjusts the mid-tones and Gamma will adjust the dark tones only.

The Selective Color adjustment layer selectively modifies the amount of a primary color without modifying the other primary colors in your image.

There are filters to change color, add blur, or create completely new image effects. Photoshop offers a virtually unlimited variety of filters for this purpose.


Click W for Object Selection/Quick Selection/Magic Wand tools ser
Click “Select Subject” on the Option bar
Click “Select and Mask” at the Option bar


Under “Select & Mask”:
View Mode: Select Overlay, adjust Opacity

Under “Select & Mask”:
1. Select “Refine Edge Brush Tool”.
2. Adjust brush size and Hardness.


1. Select “Refine Edge Brush Tool”.
2. Adjust brush size and Hardness.
3. Zoom in.
4. Brush the hair in one stroke.
5. Brush eyelashes.


1. Select “Brush Tool” or “Lasso Tool”
2. Clean the background
3. Check edges.
4. Output: Select Layer with Layer Mask.
5. Click OK to leave “Select & Mask” mode.

Under “Select & Mask”:
1. Create a “New Layer”.
2. Add “Solid color”.
3. Rename it to “bg”.
4. Drop it under the portrait layer

1. Add a Curve adjustment layer.
2. Make an S curve.
3. Right-click on the curve layer and select clipping mask.

1. Add a forest image and reposition it.
2. Select clipping mask.
3. Double click bg’ solid colour, select the “grey sky colour” with eyedropper.
4. Add mask layer.


2. Unmask her face.


2. Adjust the mask, as well as the portrait’s mask.


1. Add the two birds’ images.
2. Select Darken/Multiply blending mode to remove the white background.

2. Select a gradient map that you want to experiment with.
3. Bring down the opacity.

Imaginative & Creative idea.
Photo shooting skills.
Photoshop editing skills.

1. The illusion that is created by a combination of 2 objects (As shown by the photo).
2. Pinterest to view lots of photo manipulation works pins them.
3. Find objects in your surrounding that you can use for the project.
4. Sketch your idea.

2 exercises:
1. Hearst Mansion:
https://docs.google.com/presentation/d/1GiJPjyxXhbkZrnEHyuCTO0h6_K0E_tnew6mJp6sFGUo/edit#slide=id.gd524054b78_0_5
2. Recolouring B & W photo
https://docs.google.com/presentation/d/1qHXU7O0PnhPNBwb5lhQ2cXbQnEb_4LtO-H2be3QKZ0Q/edit#slide=id.gd82af8e96f_0_128


- PASTE selection at the B&W PORTRAIT, RENAME newly created layer to skin colour select EYEDROPPER TOOL (SHORTCUT KEY: I)


1. Repeat the process. OUTPUT TO: LAYER MASK.
2. Create NEW SOLID LAYER, Use COLOUR PICKER to choose skin colour.
3. DRAG & DROP hair layer mask to new solid layer to replace layer mask, Select SOFTLIGHT (BLENDING MODE).


2. Create a NEW SOLID LAYER, Use COLOUR PICKER to choose skin color.
3. DRAG & DROP hair layer mask to new solid layer to replace layer mask, Select SOFTLIGHT (BLENDING MODE).
- ADD SELECTION from ALL LAYERS and ADD to NEW LAYER MASK, CLEAN LAYER MASK with BRUSH TOOL, INVERT LAYER MASK.


https://drive.google.com/drive/folders/1czJ0D44XGRTp8gVCHxqcuArBfLZqWK5-?usp=sharing
Search photos online for skin/hair references. Recolour the photo for submission.

The module introduces digital visual and imaging manipulation as a tool to express students’ vision and creative reinterpretation of the world through digital visual imagery.
This module equips students with conceptual, practical, and critical skills and knowledge of digital imagery, and to use Photoshop to produce digitally generated and manipulated images. Students will develop their knowledge of and skills in digital imaging and manipulation through a series of lectures, demonstrations, and hands-on exercises.
They will undergo practical assessments in the form of projects and exercises throughout the semester. Students will then render and submit a culminated final project and/or a body of work (portfolio) to demonstrate their ability to solve communication problems using the appropriate software and hardware as a form of the final assessment.
In any form of design fundamentals, what is the most important element is composition. Composition is the term used to describe the arrangement of the visual elements. We practice composition in our daily routine from the way we organize things to the way we see them as essential parts of our life.
When we are developing a digital composition, this routine influences our subconscious brain and reflects our point of view. That’s why practicing composition is not just specifically focus on design, but it’s more towards our understanding of composition fundamental that we are practicing and apply it into our mindsets.
WEEK 1 | BEZIER GAME
Mr. Fauzi assigns us to complete the Bezier game which is learning the basics of drawing shapes with the pen tool using the website "Bezier game".
MY SCORE (26)
.png)
At first, I was stuck in this game as I'm not familiar with it. I used a few hours of trying and figuring out how to play this game. To get higher points, the first solution is to minimize the number of points I use but some of it will not be possible to trace the given shape accurately. In the end, I've completed all the games successfully!

.jpg)
.jpg)
This is a promotional poster for Evian Water. All of the elements in the composition complement the typeface. Edvin Puzinkevich's graphic ad for Evian water is absolutely perfect. I love how the combination match everything so well.
The brand, Evian, is rendered in beautiful 3D typography and fits perfectly inside the bottle. The subtext lines right up along the road. It stands out, yet doesn’t intrude, and really brings everything together.

This illustration is for 5 Corporation’s “5 Days,” a private preparatory school in Japan.
The theme of this time is "Summer Special Training".
The concept is "Let's enjoy and study during the summer".
Create ‘5’ island and ‘5’ is the symbol of this corporation.
It shows children are studying by themselves.
What we need to prepare
1. Buying a scissor, cutter, ruler, and glue (Not available to purchase Cutter)
2. Explore different graphics from magazines and Pinterest or others to trim it
3. Place elements onto the paper to design it using our creativity that brings out the message that i want to express and also a storyline
4. Glue the finalized artwork

2. Pre compositing your collage's design elements into a composition.


https://drive.google.com/drive/folders/1cGcbENrjSksAaMQK9np2jb6ZaM7Y-81l?usp=sharing
2. Follow this tutorial demo as a reference to create your digital collage:
https://youtu.be/BlW7F-fTsbE
3. Create 3 different composition digital collages from the images that you’ve downloaded.
4. Create an A4 canvas size (vertical) on Photoshop and start to do the compositions.
5. Take 3 photos of your digital collage compositions and insert them in the section below
6. Submit (Turn In) this file on Google Classroom


“THE DISTORTIONCIETY”
DESIGN
Element of Building, People, Fish, Gate of time, Mystery door, Endless Road, Leaves, Fisheye &, etc
This composition use lots of the design and I want to design it stands out by using element like fish eye, Gate of time, Mystery door, Endless Road to make it very mystery. I’ve also used elements of people with the eye to replace their face to represent the “Distortion of the Society”. To make everything look special and outstanding to express the meaning out and also to give viewer a powerful impression.
2. COMPOSITION 2 "GALACTICLEDGE"


3.COMPOSITION 3 "QUIRKSTOOL"


.png)
.png)
.png)
1. NORMAL ADJUSTMENT OF LAYERS & FILTER (RAW FILTER) - I CHOOSE THIS

After Editing, the colour of my digital composition looks brighter and more attractive first when I see the color its stand out a lot compared to the original (too dark)
Level - To adjust contrast and brightness. Shadows, mid-tones, and light areas can be adjusted separately.
Curves - The result is similar to the level. It can be used to adjust contrast, but usually Level is more convenient. A curve is a kind of advanced function.
Exposure - This can adjust brightness in the same way as the function above, but is more light-specific. If you use Exposure too much, the image becomes like an overexposure photo.
Selective colors - Hue can be adjusted by this function. It can adjust separately by colour.
Filter - This function can adjust the overall color. It is useful, but overuse can completely ruin the original atmosphere, need to be careful. Templates are already available, but you can also create your own filters by specifying your own colors.
Black and White - The blackness can be adjusted by each color separately, so if only one area is too dark, it can be solved using this adjustment layer.
I use adjustment layers such as
- Brightness/Contrast
- Level
- Curves
- Exposure
- Selective Colour
To complete the Adjustment Layer and Filter. Everything looks perfect after the Adjustment and Filter.
2. ADJUSTMENT LAYER & FILTER (CUTOUT FILTER) - DRAFT
I use adjustment layers such as

- Level
- Curves
- Exposure
- Selective Colour
To complete the Adjustment Layer and Filter and also add an obvious filter like I mention is a Cutout filter as I want to make the Composition have like (Comic Feel)
3. ADJUSTMENT LAYER & FILTER (POSTER EDGES) - DRAFT

I use adjustment layers such as
- Brightness/Contrast
- Level
- Curves
- Exposure
- Selective Colour
To complete the Adjustment Layer and Filter (to make it have Retro fill) and also add filter-like strokes that the whole composition looks very “Retro”.

- Take your own portrait photo (portrait mode)
- Collect background images online (high resolution).
- Import all images to Photoshop and convert them to black & white/ monochrome (Can be a mixture of colors with B & W).
- Make your own double exposure photo!
- Image can be landscape (1920x1080) or portrait (1080x1920)
.png)
.png)
.png)
.png)
.png)
.png)
.png)
.png)
.png)


PRACTICAL 2 - WEEK 6 | DESIGN EXPOSURE
W6: PRACTICAL: 2 x DIGITAL IMAGING EXERCISES
PROJECT 2B: DIGITAL IMAGING EXERCISE (10%)
1. PROJECT 2B - PART 1: Hearst Mansion
- Follow instructions from the W6_HEARST MANSION: https://docs.google.com/presentation/d/1GiJPjyxXhbkZrnEHyuCTO0h6_K0E_tnew6mJp6sFGUo/edit#slide=id.gd524054b78_0_5
.png)
.png)
.png)
.png)
.png)
.png)
EXERCISE 1 - SHAZAM
%20-%20with%20Shazam.jpg)
.png)
-%20me.jpg)
PROJECT 2B - PART 2: RECOLORING BLACK & WHITE
- Follow instructions from the W6_RECOLORING BREAKDOWN:
https://docs.google.com/presentation/d/1qHXU7O0PnhPNBwb5lhQ2cXbQnEb_4LtO-H2be3QKZ0Q/edit#slide=id.gd82af8e96f_0_128
EXERCISE 2: RECOLOURING B&W COLOURING
.png)
.png)
.png)
.png)
.png)
.png)
.png)
.png)
.png)
.png)
.png)

.png)
.png)
.png)
.png)
.png)
.png)
.png)


- PROJECT 2B: DIGITAL IMAGING EXERCISE (10%)
Submission: 15th May 2022
- Photo Manipulation Ideea sketch
Submission: week 7 present in class
WEEK 2 - COLLAGE DESIGN
Feedback by Mr.Fauzi Wow! This is great! You may proceed with your Final Composition for your final submission. 2. Glue your final collage and bring it to class during WEEK 4 (for F2F students only) 3. Submission template for Collage will be provided soon in Week 4 4. Update your E-Portfolio for Week 2 progress.
WEEK 3 - DIGITAL COLLAGE DESIGN
OBSERVATIONS


Comments
Post a Comment