ILLUSTRATION AND VISUAL NARRATIVE TASK 1 - VORMATOR CHALLENGE + VECTOR ILLUSTRATION
ILLUSTRATION AND VISUAL NARRATIVE TASK 1 | EXERCISES

29.3.2022 - 28.6.2022 (Week 1 - Week 14)
Er Xin Ru (Melanie) | 0354939
Bachelor Of Design (Hons) In Creative Media | Taylor's University
Subject: COM61304 - Illustration and Visual Narrative
Task 1 | Exercises
- Vormator Challenge
- Vector Illustration
INSTRUCTIONS
Week 1 | SUBJECT OUTLINE & EXPECTATIONS
We are also assigned to set up a blog called "e-Portfolio". This blog will be used to accumulate the learning process of all modules, is for submitting assignments including our assignments, drawings, photos, designs and etc. we also learned drawing shapes website with the pen tool similar to Adobe Illustrator using the website "Bezier game".
Week 1 lecture was mainly an explanation of details that what we will learn in the module. Firstly, Ms.Norhanis & Mr.Hafiz focused on taking us through the slides and where the important announcement and useful learning materials are. Lectures slides are posted on the same day too in google classroom. All the information, contents and submission is all well-organized.
.png)
I was stuck in this game as I'm not familiar with it. I used a few hours of trying and figuring out how to play this game. To get higher points, the first solution is to minimize the number of points I use but some of it will not be possible to trace the given shape accurately. In the end, I've completed all the games successfully!
Week 2 | LECTURE, TUTORIAL, PRACTICAL
Adobe illustrator in Introduction + Character Design Basic
This week's tasks:
1. Trace Vormator elements in Illustrator 2. Sketch and design your character
3. Create your character in Illustrator
.png)
Fig 1 - Stylized Design (8/4/2022)
Stylized Design
Simplifying an original concept idea - Making it iconic, straightforward, and/or unique and you can immediately recognize them even in black silhouettes. - Examples:
1. Just looking at a silhouette of Mickey Mouse makes him recognizable.
2. Simpsons have a characteristic hairstyle.
3. Bloo is a simple character from 'Fosters Home for Imaginary Friends,' having just a long semi-circle shape.
.png)
Fig 2 - Stylized Design (8/4/2022)
Stylized Design three principles are as below
1. ICONIC - Stylized designed characters are often iconic that you can immediately recognize them even in black silhouettes.2. SIMPLICITY - This is because the simplicity of the design allows viewers to digest and understand the purpose of the characters easily.
3. UNIQUE - In return makes them unique characters that are not only memorable but make an impact on the viewers.
.png)
Fig 3 - Principles of Character Design (8/4/2022)
1. Shapes
2. Colours
3. Emphasis / Contrast
4. Harmony
5. Expression / Pose
.png)
Fig 4 - Shapes (8/4/2022)
- Examples from 'Monster Inc.' movie:
1. Sully has a rectangle form, larger and thicker than most people, which makes him uncomfortable when he ventures out of his comfort zone.
2. Mike is a more well-rounded character.
3. Since Randall is the 'bad' figure, he is shaped rectangle, providing the impression of unease and unbalance.
.png)
Fig 5 - Shapes (8/4/2022)
Examples from 'Aladdin' movie:
1. Genie is an upside-down teardrop. He is a flexible, open, friendly, and bubbly character
2. Sultan is a roly-poly figure. An unstable base, like a ball rolling around, gives comedic relief
3. Jafar has a triangle shape. The feeling of uneasiness and imbalances for the evil character
.png)
Emphasis / Contrast
- Exaggerate to stand out and also draws more attention. Creates visual interest
- Examples from 'Inside Out:
1. Joy has blue eyes and hair which shows she has some understanding and compassion for Sadness
2. Sadness is fully covered in blue to emphasize her sadness
3. Anger is short as smaller size = condensed anger. Has big eyes and mouth for big emotions
Clear visualization of your character's behaviors, quirks, and personalities makes it easier to appeal to your viewers.
Examples from 'Aladdin' movie:
1. Genie is an upside-down teardrop. He is a flexible, open, friendly, and bubbly character
2. Sultan is a roly-poly figure. An unstable base, like a ball rolling around, gives comedic relief
3. Jafar has a triangle shape. The feeling of uneasiness and imbalances for the evil character
.png)
Fig 5 - Colour (8/4/2022)
Colour governs imagery from a psychological point of view, Anger is represented by red, joy by yellow, sadness by blue, and so on. Single-color impressions, on the other side, can be both positive and negative.
- Examples from the film 'Inside Out'
1. Joy is yellow, the common color to indicate happiness
2. Sadness is blue. The common color of being sad
3. Anger and red
- Exaggerate to stand out and also draws more attention. Creates visual interest
- Examples from 'Inside Out:
1. Joy has blue eyes and hair which shows she has some understanding and compassion for Sadness
2. Sadness is fully covered in blue to emphasize her sadness
3. Anger is short as smaller size = condensed anger. Has big eyes and mouth for big emotions
Clear visualization of your character's behaviors, quirks, and personalities makes it easier to appeal to your viewers.
Week 3 | LECTURE, TUTORIAL, PRACTICAL
Chiaroscuro + Pathfinder, tracing :1.png)
Fig 1 - Use of light & Dark (15/4/2022)
The use of light and dark to create the illusion of three-dimensional volume on a flat surface.
1.png)
Fig 1.2 - Use of light & Dark (15/4/2022)
An Italian term which means 'light-dark.
• In paintings, the technique refers to clear tonal contrast to suggest three-dimensional volume and modeling of objects and figures.
1.png)
Fig 1.3 - Use of light & Dark (15/4/2022)
1.png)
Fig 1.4- Use of light & Dark (15/4/2022)
highlights which are contrasted with a predominantly dark settings
1.png)
Fig 1.5- Use of light & Dark (15/4/2022)
A style of lighting for photography, film, or television.
• It accentuates the contours of the subject by throwing areas into shade while a fill light or reflector may illuminate the shadow areas to control contrast.
1.png)
Fig 1.6- Use of light & Dark (15/4/2022)
• The character Don Vito Carleone seldom showed emotions except during the scene where he sent Sonny's body to the funeral home director that owes him a favor.
1.png)
Fig 1.7 - Use of light & Dark (15/4/2022)
CHIAROSCURO IS USED IN VISUAL NARRATIVE BECAUSE...
This method is an excellent lighting choice to differentiate positive vs negative spaces
WHAT IS POSITIVE SPACE?
Refers to subject matter or object of interest in a visual
1.png)
Fig 1.8 - Use of light & Dark (15/4/2022)
This method is an excellent lighting choice to differentiate positive vs negative spaces
INCREASE DRAMATIC TENSION: Gives thrilling emotive depth to the look and feel of the scene
CREATE SENSATIONAL EFFECT: Helps elevate fantastical viewpoints to emphasize the narrative
ATTRACT ATTENTION: Establish visual hierarchy, the main point of the scene
MAKE TASTEFUL COMPOSITION: The play on negative VS positive spaces creates attractive scenes
Week 4 | LECTURE, TUTORIAL, PRACTICAL
Composition 1: Visual Shots & Composition & Light & Shadow
1.png)
Fig 1 - Composition (22/4/2022)
For example, each time you take a photo, you end up making conscious decisions about what items to include or exclude.
1.png)
Fig 1.1 - Composition (22/4/2022)
Your composed shots should consciously arrange the focus of the scene to stand out, even in the subtlest manner
1.png)
Fig 1.2 - Composition (22/4/2022)
VISUAL NARRATIVE
The visuals in the scene complement all aspects of the narrative
• Your composition should complement your subject focus and reflect the narrative. / Think of the look and feel of the scene. Get their emotions on the same page.
VISUAL FLOW
The scene has a clear flow of visuals that directs the viewer's eyes
• Your composition also determines the path of a viewer's eye through the visual
VISUAL BALANCE
The visuals in arrange to balance the composition of the scene
• Even though you can't know the exact path a viewer's eye is going to take, you can nudge things one way or another.
VISUAL HIERARCHY
The visuals are arranged in such ways that direct the viewer's eyes to specific details first
• The way you visualize and focus your subject matters can have huge effects
on the composition, the artists make and sometimes can even affect the course of history.
1.png)
Fig 1.3 - Composition (22/4/2022)
• ESRABLASHING: Wide shots were often used to establish not just the setting, but to portray spectacle and give audiences the chance to take in all the splendor and grandeur of a location, while still giving them enough information to process what's going on.
• BIRD'S EYE VIEW: Also known as overhead shots, is when the POV is placed directly above the subject. It's somewhere around a 90-degree angle above the scene taking place.
• FRAME WITHIN A-FRAME: A well-composed frame within a frame can fracture screen space, add depth, and create visual interest in your cinematic compositions.
• MEDIUM SHOT: The shot is also called a three-quarters shot which, obviously, frames three-quarters of the character. This is one of the standard camera angles used to frame a character. It's the shot in-between a close-up and a long shot.
• CLOSE UP: The close-up is an intimate moment, a look into a character's mind. It causes us to "catch" emotions, so as the rest of the scene plays out, we're already invested in the characters' well-being. Therefore, this type of shot should emphasize emotions and thoughts within a grander context.
• WORM'S EYE OVIEW: The close-up is an intimate moment, a look into a character's mind. It causes us to "catch" emotions, so as the rest of the scene plays out, we're already invested in the characters' well-being. Therefore, this type of shot should emphasize emotions and thoughts within a grander context.
Week 5 | LECTURE, TUTORIAL, PRACTICAL
Composition 2: Foreground, Middle-ground & Background1.png)
Fig 1 - Foreground, Middle Ground & Background (29/4/2022)
Composition essentially refers to how your image is put together, and there are tricks you can keep in mind that, if used in the right way, can take your art to the next level and make a piece really grab your audience's attention.
1.png)
Fig 1 .2- Foreground, Middle Ground & Background (29/4/2022)
When composing a scene, creating an effective sense of the space is very important.
Together with the other theories, illustrating elements of
• foreground (close to the viewer),
• middle-ground, and
• background (far away)
within your image will immediately communicate a sense of scale to the viewer.
1.png)
Fig 1 .3 - Foreground, Middle Ground & Background (29/4/2022)
• MIDDLE-GROUND: Objects in between foreground and background
• BACKGROUND: Objects that are the furthest away from the viewer
1.png)
Fig 1 .3 - Winter-Light exp (29/4/2022)
Example By using size differences and light/shadow contrast to highlight the main focus
1.png)
Fig 1 .4 - Marcy & Hunson exp (29/4/2022)
Example By using shapes and light/shadow contrast to highlight the main focus
1.png)
Fig 1 .5 - Turning Red exp (29/4/2022)
Week 6 | LECTURE, TUTORIAL, PRACTICAL
COMPOSITION THEORY 2: PERSPECTIVE The art of representing three-dimensional objects on a two-dimensional surface so as to give
the right impression of their
height, width, depth, and
position in relation to each other
CONSTRUCT PERSPECTIVES - Your visual should capture these rules on
.png)
Fig 1 - Construct Perspective (6/5/2022)
COMPOSITION 2//
ONE-POINT PERSPECTIVE
The most simple method of
producing three-dimensional images entails
drawing your objects emerging from a single
point on the horizon.
As images get closer to the
vanishing point the smaller they become,
until they become so small they actually
vanish completely
.png)
Fig 1.1 - One Point Perspective (6/5/2022)
Here a single vanishing point establishes the
guidelines. All objects recede toward
this one point.
.png)
Fig 1.2 - Single Vanishing Point (6/5/2022)
There are vanishing points on either side of
the horizon, and the objects and buildings
within the scene are drawn to both of these
vanishing points.
This can help create a greater sense of space
in a scene and helps give objects
more of a sense of dimension and place.
.png)
Fig 1.3 - Vanishing Point on either side of the horizon (6/5/2022)
Place two vanishing points on the horizon and
establish two sets of overlapping perspective lines
fanning out from them.
This network of lines allows objects to recede toward
two separate points, allowing more dynamic views
than that one point alone.
.png)
Fig 1.4 - Two Vanishing Point and establish two sets (6/5/2022)
Usually consists of two vanishing points on
opposite sides of a horizon (as in a two-point
perspective), but with the addition of another
vanishing point high above or below the
horizon.
This is most useful to achieve a sense of
drama and scale or to show more objects in a
single scene.
.png)
.png)
Fig 1.5 - Two Vanishing Points opposite of a horizon (6/5/2022)
If the vanishing point (which is not connected
to the horizon) is a great distance from the
horizon, the intensity of the angle will be less
than if it were placed close to the horizon
(which creates a more extreme viewing
angle).
.png)
Fig 1.6 - Vanishing Point from the horizon (6/5/2022)
A third vanishing point on the vertical axis
gives you a far broader range of angles, and
really allows your viewers to “look down” into
your city.
.png)
Fig 1.7 - Vanishing Point on the vertical axis (6/5/2022)
THREE-POINT PERSPECTIVE
A third vanishing point on the vertical axis
gives you a far broader range of angles, and
really allows your viewers to “look down” into
your city
.png)
Fig 1.8 - Three-Point Perspective (6/5/2022)
COMPOSITION 2 //
ISOMETRIC VIEW
For creating detailed concepts of
individual buildings, it’s more
beneficial to use a simple isometric
view, since it allows you to clearly
present three sides of your design
without distorting perspective or
obscuring details
1.png)
2.png)
Fig 1.9 - Isometric View (6/5/2022)
COMPOSITION 2 //
DYNAMIC APPLICATION
While perspective is extremely useful and can
be applied to almost any illustration or scene,
it doesn’t need to be rigid or boring, and you
don’t need to adhere to the perspective
method in a strict way.
For the example try mixing different
perspective methods as visualized by the
crashing spaceship and the ground below.
.png)
Fig 1.10 - Dynamic Application (6/5/2022)
Week 7 | LECTURE, TUTORIAL, PRACTICAL
3 ACTS STRUCTURE - STORYTELLING BASICS- THE END OF THE LECTURE -
INSTRUCTIONS - WEEK 1 - 3 | VORMATOR CHALLENGE

The Format is the ultimate challenge to your creativity: the aim of the project is to give each student the chance to show their ability to create a stunning piece with limited means.
TASK 1 | VORMATOR CHALLENGE
Each person will get the exact same set of, the. With these shapes, you are challenged to create your own unique design, within the limitations provided in the Rulebook. Designers are thus challenged to create a unique piece within a strict set of rules. It all comes down to pure skills and creativity in this project.
What exactly are you allowed to do and what isn’t allowed with the Elements?
The following rules have to be followed when creating your artwork:
You are allowed to rotate, flip and duplicate the Elements, You have to use all the Elements Scaling is allowed, but proportionally, so skewing or free transform you add, subtract, intersect, and group elements as you see the use of color is unrestricted; you can create your own color schemes (e.g. use adobe Color)You allowed to use gradients Elements may be filled, the use of strokes is allowed you are allowed to use filters or effects (e.g. drop shadows)
.png)
Fig 1 .2 - Samples of Vormator Challenge
We are assigned to design and create ONE unique character by using the given sets of shapes. Start with a rough sketch of your character and then use Adobe Illustrator to create the final design.
1. Sketches of my Character (Idea Sketch)
My idea of my Character was mix of Dragon & Butterfly which as u can see the head part was mainly a Dragon head and below is mixture of Dragon & Butterfly wings. Which using the Shape given to design it.

Figure 1/ Sketches of my character (15/4/2022)
2. Outline before applying the Colour (Shadow & effect is applied)

Figure 2/ Outline of my character (15/4/2022)
3. Apply Colour on my Character (Colour Scheme is applied)

Figure 3/ Outline & Colour applied of my character (15/4/2022)
The Colour i use which for the "Drattergonfly" is mosty in Bright colour which use of pink. yellow. blue, green and orange to make the "Drattergonfly" look more Butterfly feels which its a mixture of Dragon & Butterfly.
4. Final Artwork (Jpeg for Character 600 x 600 pix)
Character description:
The characters background is as follows;
Name : Drattergonfly Group : Dragon + Butterfly (Mixture)
Charcter Desceription: In her family , She is only one which is born with the all colours which in her family, they only born one between of the 5 colours. Each of the 5 colour which also represent thier ability which is
Pink: Ability of Combat Power
Yellow: Ability of Invisible Power
Blue: Ability of Teleport Power
Green: Ability of Healing Power
Green: Ability of Healing Power
Orange: Ability of Time Travel Power
In their family history, every 1000 years will only born one with have all colours which means Dratterfonfly has the most powerful power of prehistory to rule the world.
Background: The background is Drattergonfly home, which is the place she protected well even she need to rule the world.
Size : 600 x 600 pix
- My Final Artwork with Name

Figure 4 - Final of my character 600 x600 pix (15/4/2022)
- My Final Artwork only Character

600 x600 pix (15/4/2022)
Fig 6 - Submission of Vector Illustration (extra documentation) pdf (15/4/2022)
WEEK 1 - 3 | TASK 2 - VECTOR ILLUSTRATION
Game Card Design + Our Vormator Challenge

Fig 1 - Submission of Vector Illustration (30/4/2022)
Character description:
The character's background is as follows;
Name: Drattergonfly Group: Dragon + Butterfly (Mixture)
Character Description: In her family, She is the only one who is born with all colours which in her family, they only born one between of the 5 colours. Each of the 5 colour also represent their ability which is
Pink: Ability of Combat Power
Yellow: Ability of Invisible Power
Blue: Ability of Teleport Power
Green: Ability of Healing Power
Green: Ability of Healing Power
Orange: Ability of Time Travel Power
In their family history, every 1000 years will only born one with have all colours which means Dratterfonfly has the most powerful power of prehistory to rule the world.
Background: The background is Drattergonfly home, which is the place she protected well even though she need to rule the world.
Card Design: I use Simplicity and creative ways to create the game card and background, to look stand out & attractive. Words fonts which used games font to look "FUN", other elements is the use of Adobe Illustrator Pen Tool to draw out and also colour it using colour pallete refer from others website.
Card Size : 750 x 1050 pix

Fig 2 - Final Game Cad Design (30/4/2022)

Fig 3 - Final Game Card Design Background (30/4/2022)
Fig 4 - Submission of card design (extra documentation) pdf (30/4/2022)
WEEK 2 | LECTURE REPORT TASK 1
Character Design Basics - 8.4.2022
I choose COCO - DISNEY 2017,
COCO - DISNEY 2017
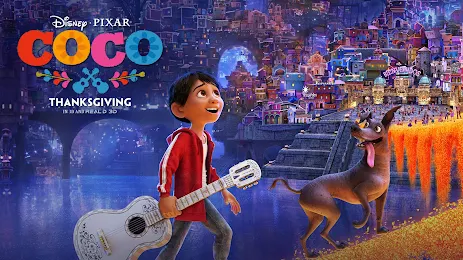
Fig 1 - Poster of Coco 2017 (8/4/2022)
This is one of my all-time favorite movies. It touches on love, loss, coming of age, finding yourself, dealing with grief, and the importance of family. This movie has such a deep meaning to me and it pulls my heartstrings every time. Love and family make the world go round. Forgiveness and change are important. Pattinson’s acting in this was remarkable. It gave me such “Catcher in the Rye” vibes. It was dark, serious, and sentimental, but what I liked most about it - was that it was real. There were fun moments, there were light moments, but the movie itself has a sad undertone which I think is heartbreaking, but remarkable. The storyline is exquisite and there was never a dull moment. I can watch it over and over again and not get bored. Not a single person won’t be able to relate to one of the themes of this movie, because it touches on so many. If you’ve never seen it, you’re missing out, I can’t stress that enough. If you like emotional, deep, sad, romantic, well-rounded movies, you have to try them out.

Fig 1 - Coco Sence in the Land of the Dead (8/4/2022)
| Background
Despite his family's generations-old ban on music, young Miguel dreams of becoming an accomplished musician like his idol Ernesto de la Cruz. Desperate to prove his talent, Miguel finds himself in the stunning and colorful Land of the Dead. After meeting a charming trickster named Héctor, the two new friends embark on an extraordinary journey to unlock the real story behind Miguel's family history.| Character Information

Fig 1.1 - Coco (Miguel) playing his favorite guitar (8/4/2022)
Miguel is a slender 12-year-old (later 13) young Mexican boy with tan skin, black hair, brown eyes, a mole below his nose, and a dimple on only one side of his mouth. He wears a red hooded jacket with white stripes over a white tank top, blue jeans with cuffs, and black shoes. When looking for Ernesto in the Land of the Dead, he gets his face painted like a skeleton in black and white shoe polish by Héctor in order to blend in, which later washes away after he accidentally falls into Ernesto's pool, near the end of the movie, he loses his hoodie and replaced his tank top with a white short-sleeved dress shirt, and the rest of his outfit remains unchanged, and later gets a red and yellow Mariachi outfit when playing Proud Corazón.
| Design Characteristics

Fig 1.2 - Coco (Miguel) did this makeup to disguise himself (8/4/2022)
Abilities
Miguel has an ear for music and is a fast learner, as he had taught himself how to play the guitar by watching one of Ernesto's old films with the guitar that he had built. Indicating a skill for craftsmanship, as he had made it himself and to make it look like his great-great-grandfather's guitar. Miguel's ear for music also helps him to possess a good singing voice, which he may have learned from listening to Ernesto and other musicians singing in the plaza, it is very likely that he had inherited musical skills from Héctor. Miguel is also fast on his feet, as he was able to outrun and escape from Pepita's "hunt" for him.Abilities
2. Colours
3. Emphasis, Contrast
4. Harmony
5. Expressions, Poses
Reference: https://disney.fandom.com/wiki/Miguel_Rivera
WEEK 3 | LECTURE REPORT TASK 2
1. STORYTELLING
2. DESIGN
3. ASPECT RATIO
4. COMPOSITION
5. CAMERA MOVEMENT
6. LIGHTNING
7. CONTRAST
8. BLOCKING
2. DESIGN
3. ASPECT RATIO
4. COMPOSITION
5. CAMERA MOVEMENT
6. LIGHTNING
7. CONTRAST
8. BLOCKING
Pick ONE scene from any
screen media (movie, drama series, animation)
that utilizes chiaroscuro lighting - a style that
emphasizes shadow and light
Write a short report (min. 500 words) about how
the lighting in the movie impacted and
accentuated the importance of the particular
scene in the narrative.
I choose Soul - Disney 2020 as my scene :
| Chiaroscuro in this Drama Series
SOUL - DISNEY 2020

Fig 1 - Soul Poster (15/4/2022)
Joe Gardner, a middle school music teacher, feels stuck in life and unfulfilled at his job. He dreams of a career in jazz, to which his seamstress mother, Libba, objects.

Fig 1.1 - Joe is a music teacher ad also dreams to be a Jazz (15/4/2022)
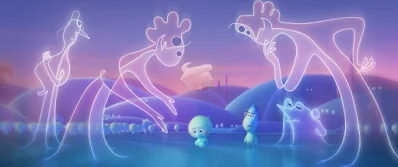
Joe finds himself as a soul heading into the "Great Beyond". Unwilling to die before his big break, he tries to escape but ends up in the "Great Before", where soul counselors-all named Jerry-prepare unborn souls for life on Earth. Joe poses as an instructor who is set to train the souls and is assigned 22, a cynical soul who has remained in the Great Before for a millennium and sees no point in living on Earth. 22 reveals that she has a badge that fills up with traits. She needs to find her "spark" to complete it and says she will give it to Joe so that he can return home.
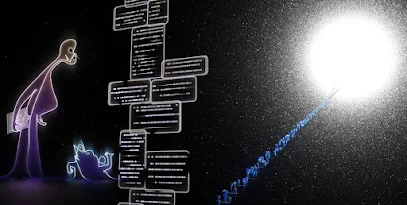
Fig 1.2 - Finding your Spark Scene fit Terry (15/4/2022)
Tasked with keeping track of the entrants to The Great Beyond, Terry can be a bit obsessive about her job. (OK, a lot obsessive.) Each Jerry does their best to tolerate Terry, whose fixation with “The Count” can be aggravating—especially if it’s off. Joe tries to assist 22 in finding a passion, but the attempts prove futile. With no other options, 22 takes him out to "the zone", an area that people enter when their passion sets them into a euphoric trance; it also houses the lost souls who become obsessed.
.jpg)
Fig 1.3 - The Counselors (15/4/2022)
The Counselors— new souls before they’re sent to Earth. “We figured if the souls just ran around amok, no one would ever leave,” and “It was just bedlam up there. They need a little bit of steering, so the universe kind of dumbs itself down in some form that we wanted to look not like another soul and not like a person from Earth.”

Fig 1.3 - Scene of Lost Souls (15/4/2022)

Fig 1.4 Escape the Lost Soul World (15/4/2022)
.png)
Fig 1.5 22 enter Joe's body & Joe enters the cat's body (15/4/2022)
Joe excitedly hops back to Earth but accidentally brings 22 with him, resulting in 22 entering his body and Joe ending up in the body of a therapy cat. Meanwhile, Terry, an accountant designated to count souls headed to the Great Beyond, finds the count off and convinces the Jerrys to let her return the missing soul.
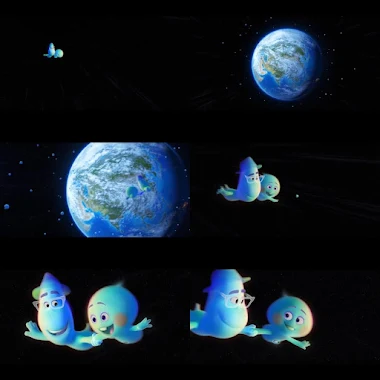
Fig 1.5 22 Joe returns bac to earth & 22 finds her purpose
of living and decide to enter her new world (15/4/2022)
Joe convinces her that she is ready to live, and she returns to normal. With her badge back, 22 finally enters Earth with Joe accompanying her for as long as he can. As he prepares to head into the Great Beyond, Joe is stopped by a Jerry who tells him that he has inspired them and will give him another chance at life. Joe thanks them and returns to his body back on Earth, now with the intent to live his life to the fullest.
As a Result of Chiaroscuro in Soul-Disney Scene, there are two different lightning for the earth world & also the "Great Beyond" world. The lighting shows the world is bright which it's represents the word "Hope", even when we feel disappointment or even failure, there are still ways of "Hope" as we can change our life to be a better way of life. The "Great Beyond" world uses lots of elements like Dark, Shine, Colour Combination, and other elements that represent the mystery, darkest sides, the reincarnation of the soul and etc which represent a realistic contract. As it's really attractive and gives most of the viewers a "wow" feel as I see the evaluation on google and also myself too as I watch this movie.
The light, Shadow, and contrast are very important as they give an obvious difference in color that can express emotion, the intention of the story, and the feeling of our audience watching it will have a great impact.
CHIAROSCURO - PEAR

Fig 1 - Line Sketches beside to make a pear shape (15/4/2022)

Fig 1.1 - Design 1 & Colour changes Apply (15/4/2022)

Fig 1.2 - Design 2 & Colour changes Apply (15/4/2022)

Fig 1.3 - Design 3 & Colour changes Apply (15/4/2022)
WEEK 4 | LECTURE REPORT TASK 3
Composition 1: Visual Shots & Composition & Light & ShadowVisual Shots & Composition
• Establishing : Wide shots were often used to establish not just the setting, but to portray spectacle and give audiences the chance to take in all the splendor and grandeur of a location, while still giving them enough information to process what's going on.
• Bird Eye View : Also known as overhead shots, is when the POV is placed directly above the subject. It's somewhere around a 90-degree angle above the scene taking place.
• Frame within a Frame : A well-composed frame within a frame can fracture screen space, add depth, and create visual interest in your cinematic compositions.
• Medium Shot : The shot is also called a three-quarters shot which, obviously, frames three-quarters of the character. This is one of the standard camera angles used to frame a character. It's the shot in-between a close-up and a long shot.
• Close Up : The close-up is an intimate moment, a look into a character's mind. It causes us to "catch" emotions, so as the rest of the scene plays out, we're already invested in the characters' well-being. Therefore, this type of shot should emphasize emotions and thoughts within a grander context.
• Worm Eye Overview : The close-up is an intimate moment, a look into a character's mind. It causes us to "catch" emotions, so as the rest of the scene plays out, we're already invested in the characters' well-being. Therefore, this type of shot should emphasize emotions and thoughts within a grander context.
1. Worm eye oview

Fig - 1 Worm eye overview (29/4/2022)
Shoot from above is to shoot above head height. Getting down low or up high can be a great way of capturing a point of view that is more dynamic or interesting. As in this picture, I take the view from below to create a view that is below the building.
.JPG)
Fig - 2 Bird eye overview (29/4/2022)
BIRD'S EYE VIEW : Also known as overhead shots, is when the POV is placed directly above the subject. It's somewhere around a 90-degree angle above the scene taking place.
This photo is outside the view of of my balcony at 19 floor.
3. Establishing

Fig - 3 Establishing (29/4/2022)
In this picture, you can see there are 2 people that are walking at the garden as u can see cleary where are they and what there are going to do next. So i choose this photo as Esrablashing composition.
4. Frame within the Frame

Fig - 4 Frame within the Frame (29/4/2022)
5. Close Up

Fig - 5 Close Up (29/4/2022)
As u can see in this picture I take it from my garden, I zoom the flower and blur out the background as it also creates a simple composition by zooming in on part of your subject and focusing on a particular detail I wanted.

Fig - 5 Medium Shots (29/4/2022)
MEDIUM SHOT : The shot is also called a three-quarters shot which, obviously, frames three-quarters of the character. This is one of the standard camera angles used to frame a character. It's the shot in-between a close-up and a long shot.
CHIAROSCURO - PEOPLE

Fig 1 - Line Sketches and Shadow Sketches (29/4/2022)

Fig 1.1 - Line Sketches and Shadow Sketches (clearer mode) (29/4/2022)

Fig 1.2 - Chiaroscuro & different colour applied (29/4/2022)


Fig.1 Elsa sitting on Water Horse | Foreground (1/5/2022)

Fig.2 Elsa uses her power | Middle Ground (1/5/2022)
Frozen II is an animated musical comedy-drama/fantasy film produced at Walt Disney Animation Studios and distributed by Walt Disney Studios Motion Pictures. Released on November 22, 2019, it is the sequel to the 2013 film, Frozen, and it is the 58th animated feature in the Disney Animated Canon.
Taking place three years after the events of the first film, Frozen II follows Elsa, Anna, Olaf, Kristoff, and Sven as they journey to an enchanted forest to save their kingdom from a curse involving the elemental spirits of water, wind, fire, and earth.
Elsa, the Snow Queen, has an extraordinary gift -- the power to create ice and snow. But no matter how happy she is to be surrounded by the people of Arendelle, Elsa finds herself strangely unsettled. After hearing a mysterious voice call out to her, Elsa travels to the enchanted forests and dark seas beyond her kingdom -- an adventure that soon turns into a journey of self-discovery.
This scene is about Nokk (the horse) was furious with Elsa and really was trying to stop her by any means possible, why did it fail? Elsa's mother, Queen Iduna (Evan Rachel Wood) was Northuldra, and her father was a prince of Agnarr; she and her sister Anna were a bridge, a connection, between the two. The spirits saw this and gave her the gift of magic. As the fifth elemental spirit, the one that would reconnect humanity to the magic of nature, she could connect with, tame, and harness the Nokk. The spirit's backstory appears to be based on the Scandinavian folklore tale of dangerous shapeshifting water-spirits that would lure travelers to the waterside.
| Foreground, Middle-Ground
- Outline areas in the scenes for each ground.
As we can see in this scene,
Second Picture as we can see Elsa uses her spell as the colour (Light and Contrast) is very obvious which the whole scene is blue to also express the storyline well. It also zoom the main character Elsa to show her expression and movement as well. So they are often described in the middle-ground, close to the background.
- Explain what design principles are applied to each
visual and how they affect the narratives.
The first & Second pictures also arrange a good focus and arrangement of visual focus using foreground, and middle-ground which indicates a sense of movement, and rhythm in your of the picture (scene), This is known to be Design Flow.
FEEDBACK
WEEK 1 - WEEK 5
So far for these 5 weeks, I've not gotten any feedback as I'm okay with my assignment as there are recordings and also we can ask in the chat. I got everything clear during the class but if there is not, I will see back the videos or see the instruction given at times. Ms.Noraniz and Mr.Hafiz are very friendly as well and I feel very enjoying during the class, with clear lectures, and tutorials.
WEEK 1 - WEEK 5
Experiences
At first, I feel a bit lost and cannot catch up since some of the assignments need much of an illustrator that I still need some improvement about it. But after a few weeks of teaching, I believe I am beginning to master illustrator more. I also had a lot of fun making a character out of simply that formator challenge. I've learned to use my limitations and research to reach and learn a great design. I believe I will improve much more if there are design assignments I knew it will be much stress but I believe I can resist. For Card Design, I was also less confident because I'm not good at using the illustration pen tool to draw, but I try my best to complete it and also struggle with this because there are so many options for designing the card, which makes me indecisive.
At first, I feel a bit lost and cannot catch up since some of the assignments need much of an illustrator that I still need some improvement about it. But after a few weeks of teaching, I believe I am beginning to master illustrator more. I also had a lot of fun making a character out of simply that formator challenge. I've learned to use my limitations and research to reach and learn a great design. I believe I will improve much more if there are design assignments I knew it will be much stress but I believe I can resist. For Card Design, I was also less confident because I'm not good at using the illustration pen tool to draw, but I try my best to complete it and also struggle with this because there are so many options for designing the card, which makes me indecisive.


Comments
Post a Comment