DIGITAL PHOTOGRAPHY AND IMAGING | TASK 2
DIGITAL PHOTOGRAPHY AND IMAGING | TASK 2

27.4.2022 - 25.5.2022 (Week 5 - Week 9)
Er Xin Ru (Melanie) | 0354939
Bachelor Of Design (Hons) In Creative Media | Taylor's University
Subject : GCD61204 - Digital Photography & Imaging
Task 2 | Exercises
- Double Exposure
- Heart Mansion & Recolouring
- Photo Manipulation
LECTURES
WEEK 5 | DOUBLE EXPOSURE - 27.4.2022
Introduction to Photoshop 2: Double Exposure & Image Blending Mode

Figure 1 - Open Portrait (27/4/2022)
Open portrait image in Photoshop:
Click W for Object Selection/Quick Selection/Magic Wand tools ser
Click “Select Subject” on the Option bar
Click “Select and Mask” at the Option bar
Click W for Object Selection/Quick Selection/Magic Wand tools ser
Click “Select Subject” on the Option bar
Click “Select and Mask” at the Option bar


Figure 1.1 - "Select & Mask" (27/4/2022)
Under “Select & Mask”:
View Mode: Select Overlay, adjust Opacity

Figure 1.2 - "Refine Edge Brush Tool" (27/4/2022)
Under “Select & Mask”:
1. Select “Refine Edge Brush Tool”.
2. Adjust brush size and Hardness.


Figure 1.3 - "Refine Edge Brush Tool" (27/4/2022)
1. Select “Refine Edge Brush Tool”.
2. Adjust brush size and Hardness.
3. Zoom in.
4. Brush the hair in one stroke.
5. Brush eyelashes.


Figure 1.4 - "Select Brush Tool and Lasso Tool" (27/4/2022)
1. Select “Brush Tool” or “Lasso Tool”
2. Clean the background
3. Check edges.
4. Output: Select Layer with Layer Mask.
5. Click OK to leave “Select & Mask” mode.

Figure 1.5 - Create a "New Layer" (27/4/2022)
Under “Select & Mask”:
1. Create a “New Layer”.
2. Add “Solid color”.
3. Rename it to “bg”.
4. Drop it under the portrait layer

Figure 1.6 - Increase contrast for portrait layer (27/4/2022)
1. Add a Curve adjustment layer.
2. Make an S curve.
3. Right-click on the curve layer and select clipping mask.

Figure 1.7 - Double Exposure (27/4/2022)
1. Add a forest image and reposition it.
2. Select clipping mask.
3. Double click bg’ solid colour, select the “grey sky colour” with eyedropper.
4. Add mask layer.


Figure 1.8- Unmask (27/4/2022)
2. Unmask her face.


Figure 1.9- Duplicate and Adjust the mask (27/4/2022)
2. Adjust the mask, as well as the portrait’s mask.


Figure 1.10- Darken/Multiply to remove background (27/4/2022)
1. Add the two birds’ images.
2. Select Darken/Multiply blending mode to remove the white background.

Figure 1.11 - Add Gradient and bring down opacity (27/4/2022)
2. Select a gradient map that you want to experiment with.
3. Bring down the opacity.
WEEK 6 | PHOTO MANIPULATION IDEATION - 4.5.2022
Photo Manipulation: Imagination & Creative Idea | Photo Shooting Skill & Editing Skill
Figure 1 - Photo Manipulation Ideation 1 (4/5/2022)
Widely accepted as an art form, photo manipulation requires skill as well as an active imagination to create an illusion.
Imaginative & Creative idea.
Photo shooting skills.
Photoshop editing skills.

Figure 1 - Photo Manipulation Ideation 2 (4/5/2022)
1. The illusion that is created by a combination of 2 objects (As shown by the photo).
2. Pinterest to view lots of photo manipulation works pins them.
3. Find objects in your surrounding that you can use for the project.
4. Sketch your idea.

Figure 1 - Photo Manipulation Ideation 3 (4/5/2022)
2 exercises:
1. Hearst Mansion: https://docs.google.com/presentation/d/1GiJPjyxXhbkZrnEHyuCTO0h6_K0E_tnew6mJp6sFGUo/edit#slide=id.gd524054b78_0_5
2. Recolouring B & W photo
https://docs.google.com/presentation/d/1qHXU7O0PnhPNBwb5lhQ2cXbQnEb_4LtO-H2be3QKZ0Q/edit#slide=id.gd82af8e96f_0_128
WEEK 7 | DIGITAL IMAGING EXERCISE - 10.5.2022
PART 02: The Breakdown- Select skin color with MARQUEE TOOL, COPY selected area
SHORTCUT KEY: MARQUEE TOOL: M, COPY: CMD/CTRL C


- PASTE selection at the B&W PORTRAIT, RENAME newly created layer to skin colour select EYEDROPPER TOOL (SHORTCUT KEY: I)
Figure 1 - Recolouring Tutorial (11/5/2022)
- PASTE selection at the B&W PORTRAIT, RENAME newly created layer to skin colour select EYEDROPPER TOOL (SHORTCUT KEY: I)


Figure 1.1 - Recolouring Tutorial 1 (11/5/2022)
1. Repeat the process. OUTPUT TO: LAYER MASK.
2. Create NEW SOLID LAYER, Use COLOUR PICKER to choose skin colour.
3. DRAG & DROP hair layer mask to new solid layer to replace layer mask, Select SOFTLIGHT (BLENDING MODE).


Figure 1.2 - Recolouring Tutorial 2 (11/5/2022)


Figure 1.3 - Recolouring Tutorial 3 (11/5/2022)
2. Create a NEW SOLID LAYER, Use COLOUR PICKER to choose skin color.
3. DRAG & DROP hair layer mask to new solid layer to replace layer mask, Select SOFTLIGHT (BLENDING MODE).
- ADD SELECTION from ALL LAYERS and ADD to NEW LAYER MASK, CLEAN LAYER MASK with BRUSH TOOL, INVERT LAYER MASK.


Figure 1.4 - Recolouring Tutorial 4 (11/5/2022)

Figure 1.5 - Recolouring Tutorial 5 (11/5/2022)
Select ONE B&W photo from the folder:
https://drive.google.com/drive/folders/1czJ0D44XGRTp8gVCHxqcuArBfLZqWK5-?usp=sharing
Search photos online for skin/hair references. Recolour the photo for submission.
https://drive.google.com/drive/folders/1czJ0D44XGRTp8gVCHxqcuArBfLZqWK5-?usp=sharing
Search photos online for skin/hair references. Recolour the photo for submission.

Figure 1.6 - Recolouring Black & White Asssignement (11/5/2022)
INSTRUCTION
The Concept
The module introduces digital visual and imaging manipulation as a tool to express students’ vision and creative reinterpretation of the world through digital visual imagery.
This module equips students with conceptual, practical, and critical skills and knowledge of digital imagery, and to use Photoshop to produce digitally generated and manipulated images. Students will develop their knowledge of and skills in digital imaging and manipulation through a series of lectures, demonstrations, and hands-on exercises.
They will undergo practical assessments in the form of projects and exercises throughout the semester. Students will then render and submit a culminated final project and/or a body of work (portfolio) to demonstrate their ability to solve communication problems using the appropriate software and hardware as a form of the final assessment.
The Mindsets
In any form of design fundamentals, what is the most important element is composition. Composition is the term used to describe the arrangement of the visual elements. We practice composition in our daily routine from the way we organize things to the way we see them as essential parts of our life.
When we are developing a digital composition, this routine influences our subconscious brain and reflects our point of view. That’s why practicing composition is not just specifically focus on design, but it’s more towards our understanding of composition fundamental that we are practicing and apply it into our mindsets.
WEEK 5 | DOUBLE EXPOSURE - 4.5.2022
Double Exposure & Image Blending Mode

Figure 1 - Double exposure & image blending mode (4/5/2022)
Double exposure photography refers to merging multiple images. The goal is to make them surreal, emotional, or humorous. They usually feature silhouettes.
Double exposure effect may look complicated at first. But it’s easy to make in-camera and in Adobe Photoshop. You don’t need a double exposure camera, as there are a few other ways you can create them.
In the editing world, you have endless possibilities. You can transform ordinary photographs into powerful masterpieces.

Figure 2 - What is Double Exposure (4/5/2022)
Photoshop has a great tilt-shift tool that will transform your photos into soft works of art.
If you want to be extra creative, blur one of your photos instead of the entire image. Or blur everything except for one important detail.
To add this feature, go to Filter > Blur Gallery > Tilt-Shift.

Figure 3 - Use Tilt Shift Effect (4/5/2022)
There are many ways you can create reflections. One of them is creating a double-exposure with the help of a separate window photo.
This is an example of main subject surface with raindrops and bokeh. This help to add interesting textures to a multiple exposure photography.

Figure 4 - Use Tilt Shift Effect (4/5/2022)
Combining something plain with something complicated will give you a balanced result. It will also save a lot of simple photos that you might discard.

Figure 5 - Simple portraits and details (4/5/2022)
4. Convert your results to Black & White
A lack of colour will strengthen the emotions in your double-exposure images. If you want to express your work in a vulnerable way, experiment with this.
It gives them a unique depth and allows you to experiment with something interesting just like film photography.

Figure 6 - Convert Black & White (4/5/2022)
Many double exposure photographers choose to work with silhouettes. But what if you worked with silhouettes only?
It would give you a fun and doable challenge. And an opportunity to show very creative sides of yourself.
Try silhouettes of yourself, other people, or random objects. Anything else that catches your eye can create unique composite images.

Figure 7 - Convert Black & White (4/5/2022)
6. Pick two random photo
A random process doesn’t mean it’s not meaningful. Your results might create a story of their own, one that others will find encouraging.
A lot of double exposures photography were happy accidents. But they led to great feedback and even greater creative growth. Try and forget about any other double-exposure ideas. Shoot interesting textures, shapes and forms instead.

Figure 8 - Random photo (4/5/2022)
Take photos of everyday objects you usually take for granted. Try to make them look like something else.
A silhouette of a dull-looking building could become the outline of a starry sky like the photo below.
This technique will enhance your imagination.

Figure 9 - Simple object look fascinating (4/5/2022)
Outlines of any kind are fantastic to work with for double-exposure photography. Shadows are as effective as silhouettes in this genre. They’re fascinating to work with.
Take a photo of someone’s shadow and transform it into a story.
You can do anything your heart desires with outlines of this sort. All you have to do is go out, take photos of a few shadows, and turn them into something beautiful.

Figure 10 - Use shadow (4/5/2022)


PHOTOSHOP : Blend Modes
A particular blending mode works really well on more difficult subjects like glass, smoke, fire and lightning. Take these images for example.
How to combine the smoke on top of the image of the musicians? A real mess could be made of this and it could become very difficult and time consuming.
A particular blending mode works really well on more difficult subjects like glass, smoke, fire and lightning. Take these images for example.
How to combine the smoke on top of the image of the musicians? A real mess could be made of this and it could become very difficult and time consuming.

Figure 11 - Blend Modes (4/5/2022)
PHOTOSHOP : Blend Modes
Here’s a quick guide:
1. Select the Layer 1 (Fire) to be on top of the Background (Musicians)
2. Go to the Blending Modes option
3. Select “Screen”
As a result, all of the pixels on the fire will be selected as Screen blending mode.

Figure 12 - Blend Modes (4/5/2022)
WEEK 7 | DIGITAL PHOTOGRAPHY - 11.5.2022
Digital Photography & Camera Lens

Figure 1 - Exposure (11/5/2022)
EXPOSURE:
In photography, exposure is the amount of light which reaches your camera sensor or film.

Figure 2 - Camera (11/5/2022)
The main parts of the camera:
Camera body:
- Shutter
- Image sensor
- LCD screen
- Camera lens:
- Aperture/ Iris
The camera body is a light proof box.

APERTURE
1. IRIS
2. SHUTTER SPEED
3. ISO
There are only two camera settings that affect the actual “luminous exposure” of an image: shutter speed and aperture. The third setting, camera ISO, also affects the brightness of your photos.

Figure 4 - Iris (11/5/2022)
IRIS:
Iris/Aperture is control the flow of light entering the lens.

Figure 4 - Iris (11/5/2022)
IRIS:
Iris/Aperture is measured by f-stop, indicated by sequence of f-number: f/1, f/1.4, f/2 , f/ 2.8, f/ 4, f/ 5.6, f/ 8, f/ 11, f/ 16, f/22 , f/32..
The lower the f-number, the larger the lens opening.

Figure 5 - Shutter (11/5/2022)
2. SHUTTER:
The shutter is a small plastic sheet that opens and closes to allow light onto the film or prevent light from reaching the film.

Figure 4 - Shutter Speed (11/5/2022)
3. SHUTTER SPEED:
Shutter speed is measured in seconds: 1/1000 s,1/500 s,1/250 s,1/125 s,1/60 s,1/30 s,1/15 s,1/8 s,1/4 s,1/2 s,1 s, 2 s, 3 s…

Figure 5 - ISO (11/5/2022)
4. ISO:
Originally referred to the sensitivity of film—it's "light gathering" ability. For digital photography, ISO refers to the sensitivity—the signal gain—of the camera's sensor.

Figure 6 - ISO (11/5/2022)
ISO:
The common ISO camera settings are: 100, 200, 400, 640, 800, 1600, 3200, 6400….

Figure 7 - ISO (11/5/2022)
ISO:
The lower the number of ISO the less sensitive your camera is to light and the finer the grain.

Figure 8 - Camera lenses (11/5/2022)
Appropriate lens provided desire framing, lens choice affects angle of view
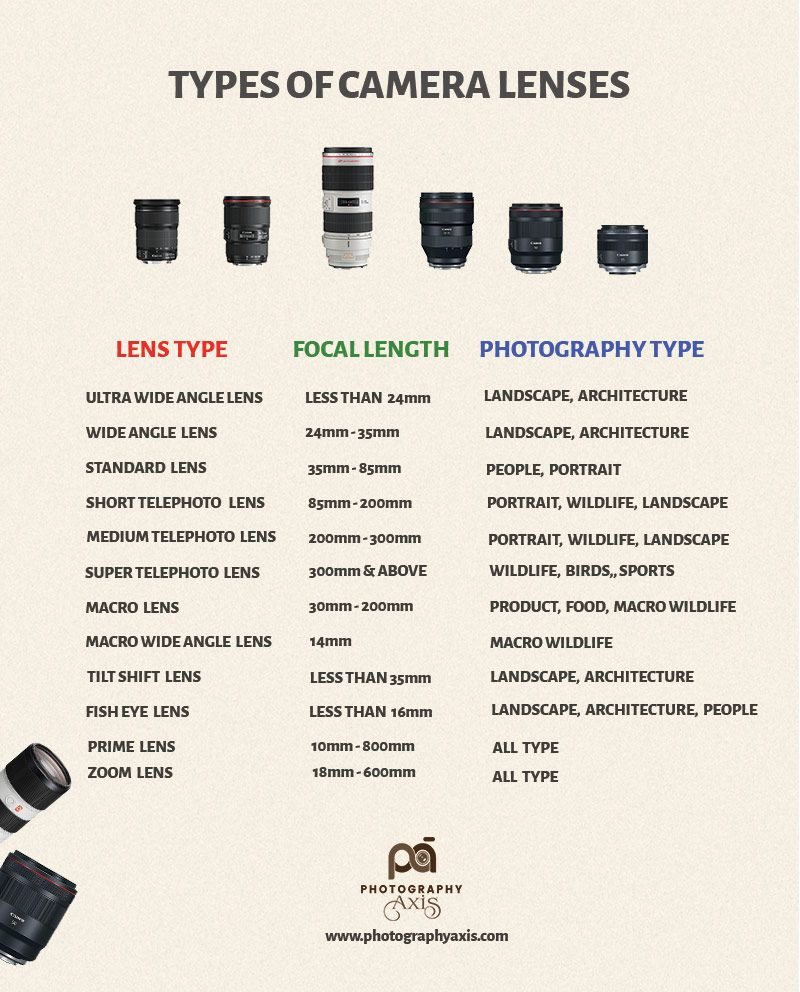
Figure 9 - Type of lenses (11/5/2022)
Different lenses are designed for different for different purposes. Lenses can be categorized by FOCAL LENGTH.

Figure 10 - Focal Length (11/5/2022)
5. FOCAL LENGTH:
Focal length is the measurement (in millimeters) from the optical center of a camera lens to the camera’s sensor.

Figure 11 - Focal Length (11/5/2022)
6. DEPTH OF FIELD:
The proportion of the image that is reasonably sharp and in focus.

Figure 12 - Lens Aperture Chart (11/5/2022)
DEPTH OF FIELD:
The smaller the aperture you use, the greater the depth of field.


Figure 13 - Depth of Field (11/5/2022)
7. LENS PERSPECTIVE:
- Wide angle lens is especially useful for landscape photography or street photography. With wide angle lenses, almost everything is in focus, unless your subject is very close to the lens.
- Standard lens offer a fairly accurate representation of what the human eye sees, both in terms of visual angle and perspective.
- Tele lenses are great for isolating a subject that is far away.

Figure 14 - Lens Perspective (11/5/2022)
8. DSLR V.S SMARTPHONE
Smartphones vs Cameras = Convenience vs Quality
- DSLR cameras are designed to capture images. Phones are designed to carry out a multitude of functions.
WEEK 9 | DIGITAL SURREALISM - 25.5.2022
Digital Photography & Camera Lens
REALISM VERSUS SURREALISM

REALISM
Takes subject matters of the ordinary and common world which we call "reality." It almost always takes a non-exotic and non-extraordinary subject matter and theme. There is no need to think outside of the box, as that is not "real."

Figure 2 - Surrealism (25/5/2022)
SURREALISM
A twist on Realism. It explores the subconscious mind, with subject matters concentrating on dream-images and often aims to distort the ordinary and what we call reality

Figure 3 - Surrealism (25/5/2022)
SURREALISM
Surrealism defies logic. Dreams and the workings of the subconscious mind inspire surrealistic art (French for "super-realism") filled with strange images and bizarre juxtapositions.

Figure 4 - Surrealism 1 (25/5/2022)
Fueled by the teachings of Freud and the rebellious work of Dada artists, surrealists like Salvador Dalí promoted free association and dream imagery.

Figure 5 - Dadaism (25/5/2022)
DASAISM
An anti war art movement with art works that is satirical and nonsensical in nature.
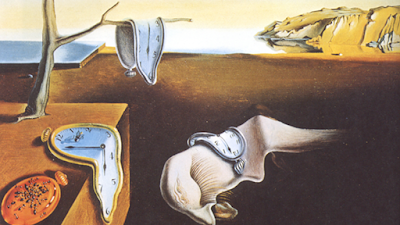
Figure 6 - Dadaism (25/5/2022)
SALCADOR DALí
Salvador Dalí was a Spanish Surrealist painter and printmaker known for exploring subconscious imagery.
WHAT IS DIGITAL SURREALISM?
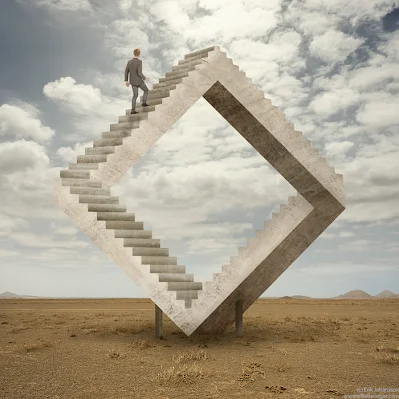
Figure 7 - Digital Surrealism (25/5/2022)
Surrealism is a cultural movement focused on type of arts to express about the artist’s idea themselves. In this digital era surrealism is one of the top digital art styles.
HOW TO START CREATING SURREALISM ARTWORKS?

Figure 8 - Create Surrealism (25/5/2022)
Dream-like scenes and symbolic images

Figure 9 - Create Surrealism (25/5/2022)
Bizarre assemblages of ordinary objects
CAPTURING YOUR DREAM

Figure 10 - Capturing your dream (25/5/2022)
Capturing your Dream
1. Sketch It Out
Take a piece of paper and pen/pencil or a tablet and start to sketch. Draw your vision out roughly. Don't finesse any details yet, but just lay out key points of your vision.
2. Find Reference Images
Gathering reference images will help you greatly in realizing your new idea. Gather images that directly relate to what you have in mind.
MINDSET DURING CREATION

Figure 11 - Capturing your dream (25/5/2022)
Mindset During Creation
1. "Does this look real?"
Surrealism is at its best when it's convincing enough that it could be real, however we obviously know that the subject matter you are creating is nonexistent, thus is not real.
2. Make it happen to the best of your ability.
When you try to approach something challenging, you will learn the skills you may need for next time to make it work. The worst thing you can do is be afraid and back off from your idea, because you would never learn that way.

Figure 12 - Create surrealist images (25/5/2022)
Photoshop makes it easier than ever to create surrealist images, requiring just a modicum of photomontage skill to produce impressive results.
- END OF LECTURE -
ASSIGNMENT 2 - WEEK 5 | DESIGN EXPOSURE
Week 5 Double Exposure task:- Take your own portrait photo (portrait mode)
- Collect background images online (high resolution).
- Import all images to Photoshop and convert them to black & white/ monochrome (Can be a mixture of colors with B & W).
- Make your own double exposure photo!
- Image can be landscape (1920x1080) or portrait (1080x1920)
My Exercise
.png)
Figure 1 - Show Details with Refine Brush Tools (11/5/2022)
.png)
Figure 2 - Background Remove (11/5/2022)
.png)
Figure 3 - Add forest image and make Clipping Mask (11/5/2022)
.png)
Figure 4 - Unmask her face (11/5/2022)
.png)
Figure 5 - Duplicate forest layer (11/5/2022)
.png)
Figure 6 - Add forest and birds photo (11/5/2022)
.png)
Figure 7 - Gradient Map (11/5/2022)
.png)
Figure 7 - Gradient Map (11/5/2022)
.png)
Figure 7 - (11/5/2022)

Figure 1 - Double Exposure Exercise (27/4/2022)
Composed photo:

.jpg)
Figure 1 - Composed Photo (27/4/2022)

Figure 2 - Final Double Exposure Exercise (27/4/2022)
PRACTICAL 2 - WEEK 6 | DESIGN EXPOSURE
W6: PRACTICAL: 2 x DIGITAL IMAGING EXERCISES
PROJECT 2B: DIGITAL IMAGING EXERCISE (10%)
1. PROJECT 2B - PART 1: Hearst Mansion
- Follow instructions from the W6_HEARST MANSION: https://docs.google.com/presentation/d/1GiJPjyxXhbkZrnEHyuCTO0h6_K0E_tnew6mJp6sFGUo/edit#slide=id.gd524054b78_0_5
.png)
Figure 1 - Step 1 Shazam (10/5/2022)
.png)
Figure 2 - Step 2 Shazam (10/5/2022)
.png)
Figure 3 - Step 3 Shazam look like at the place (10/5/2022)
.png)
Figure 4 - Step 4 Shazam shadow (10/5/2022)
.png)
Figure 5 - Step 5 Shazam natural shadow (10/5/2022)
.png)
Figure 6 - Step 6 Final (10/5/2022)
EXERCISE 1 - Shazam
%20-%20with%20Shazam.jpg)
Figure 1 - Heart Mansion - Shazam (10/5/2022)
EXERCISE 1 - Me
.png)
Figure 1 - Heart Mansion - Me applying Shadow (10/5/2022)
(My photo normal shot using the eyeline view)
-%20me.jpg)
Figure 2 - Heart Mansion - Me (10/5/2022)
2. PROJECT 2B - PART 2: Recoloring Black and White
- Follow instructions from the W6_RECOLORING BREAKDOWN:
https://docs.google.com/presentation/d/1qHXU7O0PnhPNBwb5lhQ2cXbQnEb_4LtO-H2be3QKZ0Q/edit#slide=id.gd82af8e96f_0_128
EXERCISE 2: RECOLOURING B&W COLOURING
My Exercise
.png)
Figure 1 - Step 1 Recolouring (10/5/2022)
.png)
Figure 2 - Step 2 Recolouring hair (10/5/2022)
.png)
Figure 3 - Step 3 Recolouring hair (10/5/2022)
.png)
Figure 4 - Step 4 Skin Recolouring (10/5/2022)
.png)
Figure 5 - Step 5 using Refine tool (10/5/2022)
.png)
Figure 6 - Step 6 Ensure Skin Recolouring (10/5/2022)
.png)
Figure 7 - Step 7 Eye and Mouth Recolouring (10/5/2022)
.png)
Figure 8 - Step 8 Eye and Mouth Recolouring (10/5/2022)
.png)
Figure 9 - Step 9 Eye and Mouth Recolouring (10/5/2022)
.png)
Figure 10 - Step 10 Background Recolouring (10/5/2022)
.png)
Figure 11 - Step 11 Final (10/5/2022)

Figure 12 - Final (10/5/2022)
My idea of recolouring using sharp colours as I wanted the makeup and he whole photo look stands out when its show as a picture, magazine or even in cover of an album.
.png)
Figure 1 - Step 1 Recolouring hair dark brown (10/5/2022)
.png)
Figure 2 - Step 2 Use refine tool Recolouring hair (10/5/2022)
.png)
Figure 3 - Step 3 to check the smoothness hair (10/5/2022)
.png)
Figure 4 - Step 4 Recolouring eye & mouth 10/5/2022)
.png)
Figure 5 - Step 5 Clipping mask (10/5/2022)
.png)
Figure 6 - Step 6 Recolouring Background (10/5/2022)
.png)
Figure 7 - Step 7 Final (10/5/2022)
FINAL
My idea of recolouring using sharp colours as I wanted the makeup and he whole photo look stands out when its show as a picture, magazine or even in cover of an album.


Figure 1 - Compare Recolouring Black & White | Colour (10/5/2022)

Figure 2 - Final Recolouring Black & White | Colour (10/5/2022)
SUBMISSION
- PROJECT 2B: DIGITAL IMAGING EXERCISE (10%)
Submission: 15th May 2022
- PROJECT 2B: DIGITAL IMAGING EXERCISE (10%)
Submission: 15th May 2022
LECTURE REPORT TASK 2C | WEEK 6 - WEEK 11
Project 2 C: Photo Manipulation
This project is an exercise in creative ideas, compositing all manner of everyday objects to create interesting composite photographs.
This project is an exercise in creative ideas, compositing all manner of everyday objects to create interesting composite photographs.
1. Reference moodboard
2. Write a summary about your idea
3. Sketches
PART 1 :Research Mood Board (3 reference)


2. Write a summary about your idea
My idea/concept was i always imagine if i can hold something that are impossible and i always used to imagine with. After that, i think of something that i always imagine of which are the combinations of my hand holding (inside) have water/sea, fish jumping out, ship above on sea/water, some fish in the water/sea some seagrass that make everything look stands out & interesting.
Some roughly idea before starting were:
1. I set up lighting and my camera (good quality than using phone) to shoot my hand (holding the water/sea movement)
2. Find some of the picture for the object i wanted to photoshop in was - Water/Sea, Fishes, Seagrass, Ship, Cloud, Birds & etc.
3. Put in my hand photo in Photoshop to edit the background, colour and etc.
4. Edit the objects (with my idea) - in Sketches
5. Edit the tone/ Colour of the Photo Manipulation
6. Put Simple Background (Focus more on the Ideas)
3. Sketches
4. My Progress 1 (Shooting,Set Up Lighting)


5. My Progress 2 (PS,AI)


PART 2: Mock up (WEEK 10)
2. Write a summary about your idea
3. Sketches
PART 1 :Research Mood Board (3 reference)

Fig 1 - Reference 1 (25/5/2022)

Fig 2 - Reference 2 (25/5/2022)

Fig 3 - Reference 3 (25/5/2022)
My idea/concept was i always imagine if i can hold something that are impossible and i always used to imagine with. After that, i think of something that i always imagine of which are the combinations of my hand holding (inside) have water/sea, fish jumping out, ship above on sea/water, some fish in the water/sea some seagrass that make everything look stands out & interesting.
Some roughly idea before starting were:
1. I set up lighting and my camera (good quality than using phone) to shoot my hand (holding the water/sea movement)
2. Find some of the picture for the object i wanted to photoshop in was - Water/Sea, Fishes, Seagrass, Ship, Cloud, Birds & etc.
3. Put in my hand photo in Photoshop to edit the background, colour and etc.
4. Edit the objects (with my idea) - in Sketches
5. Edit the tone/ Colour of the Photo Manipulation
6. Put Simple Background (Focus more on the Ideas)

Fig 1 - Sketches (25/5/2022)

Fig 1 - Reference 4 (25/5/2022)

Fig 2 - Reference 5 (25/5/2022)

Fig 3 - Reference 6 (25/5/2022)

Fig 4 - Reference 7 (25/5/2022)

Fig 5 - Reference 8 (25/5/2022)

Fig 6 - Reference 9 (25/5/2022)

Fig 7 - Reference 10 (25/5/2022)

Fig 1 - Progress 1 (1/6/2022)

Fig 2 - Progress 2 (1/6/2022)
PART 3 : FINAL ARTWORK (WEEK 11)

Fig 1 - Final Artwork (8/6/2022)
TITLE: THE AQUATECT HAND
DESCRIPTION: A hand holding a "sea" that I imagined to demonstrate the concept of impossible, exaggerated, and unreality feeling which shines out in a photograph.
There is also a meaning to it, which is to "protect" our ecosystem, as well as to emphasize that we should always protect the sea by not damaging it, as shown in the photo, under the sea contains live things and u can see it clearly when we maintain clearness of the water.


Comments
Post a Comment